There are several ways one can change the size of an image in Photoshop. You can resize the image, or you can resample it by using the Image Size dialogue box. You can find this under the Image menu at the top of the screen. The main difference between resizing and resampling an image is controlled by nothing more than a single checkbox option. And of course through the ‘Save for the Web’ option, which we will later discuss.
Resampling means “making things up” or “guessing.” Photoshop makes educated guesses when adding pixels to increase resolution. If the camera didn’t capture it, or the scanner didn’t scan it, the information to fill in those new pixels has to come from somewhere, even if it is out of thin air.
Watch our videos for Saving for the Web.

Image Resizing: Change the size the image will print without changing the number of pixels in the picture.
Image Resampling: Change the number of pixels in the image.
Look up Image Size
Let’s look at what the Image Size dialogue box to tell us about the image. To access it, I’ll use the keyboard shortcut, Command Option I (or PCL Control Option I). Or you can go up to the Image menu and choose Image Size.
Photoshop’s Image Size dialogue box is divided up into two main sections – the Dimensions (web) section on top, and the Document Size (print) section below it. The Dimensions section tells us the width and height of our image in pixels, and also tells us the image size of our image. Below the ‘Fit To’ is the Document Size section.
There are three more options in the Image Size dialogue box below the Document Size section we should also take note: Scale Styles, Constrain Proportions and Resample Image:
Scale Styles:
This is about Layer Styles and how they’re affected by resizing or resampling the image.
Constrain Proportions:
Connects the height and width of the picture so that if you make a change to the width of the image, it will automatically change the height; the proportions of the image remain the same and doesn’t get distorted. By default, this is what we want—but for some reason, you want to be able to change the width and height separately of each other, uncheck the Constrain Proportions checkbox.
Resample Image:
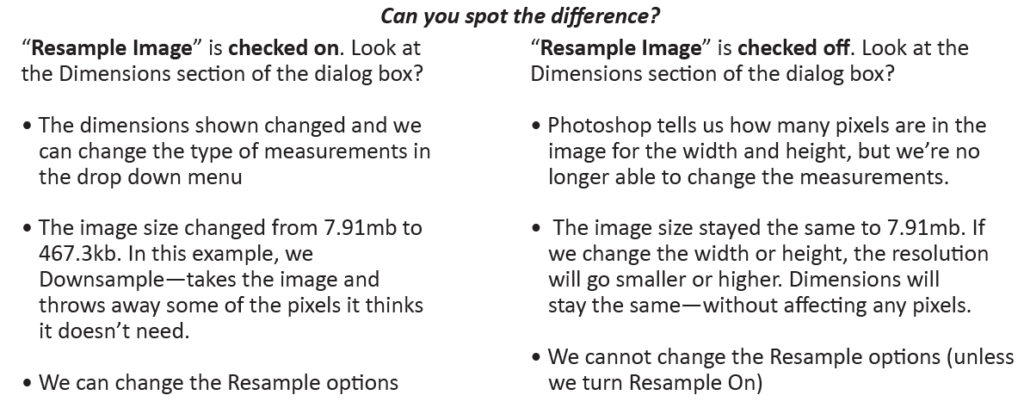
The option that determines whether we’re resizing our image or resampling it. To understand the difference between what we’ll call the “Image Resize” version and the “Image Resample” version of the Image Size dialogue box, here’s a screenshot of the Original Image and when we Change the Width with the “Resample Image” option checked on and with “Resample Image” unchecked:
When Resample is checked, PhotoShop has options only apply to images that are being resampled. These options will be grayed out if the resample is checked on. It’s Photoshop’s “interpolation algorithms.” It essentially means how Photoshop throws away pixels when you resample the image to a smaller size, and how it adds pixels when you resample the image to a larger scale. It can make a big difference with image quality knowing when to use which option or use the suggested recommendation as shown.

Resample Options:
Automatic
Photoshop chooses the resampling method based on the document type and whether the document is scaling up or down.
Preserve Details (enlargement)
When this method is chosen, a Noise reduction slider becomes available for smoothing out noise as you upscale the image.
Bicubic Smoother (enlargement)
A suitable method for enlarging images based on Bicubic interpolation but designed to produce smoother results.
Bicubic Sharper (reduction)
To maintain the detail in a resampled image, use this method to reduce the size of an image based on Bicubic interpolation with enhancing sharpening.
Bicubic (smoother gradients)
The one I use often but a more precise method based on an examination of the values of surrounding pixels. Using more complex calculations, Bicubic produces smoother tonal gradations than Nearest Neighbor or Bilinear.
Nearest Neighbor (hard edges)
A fast but less precise method that replicates the pixels in an image. This method preserves hard edges and produces a smaller file in illustrations containing edges that are not anti-aliased. However, this method can produce jagged effects, which become apparent when you distort or scale an image or perform multiple manipulations on a selection.
Bilinear
A method that adds pixels by averaging the colour values of surrounding pixels. It produces medium-quality results. This option averages the values from surrounding pixels rather than merely copying them.