The animation is a sequence of images, or frames, that vary slightly to create the illusion of movement over time. The GIF file format (Graphics Interchange Format) is used primarily for clip art, text, and line art, or for images that contain areas of solid colour.
Because of its graphic element, a banner ad stays in one place on a page. Still, it can present multiple images, including animation and change appearance in several other ways. In the following animation, it is comprised of 11 frames set at 0.2 seconds per frame, but the only animation playing is the tee shirts as the content (type) is set in place.

Note: Our animated GIF will be dynamic (animated). The delay should be set at a maximum of 2 to 3 seconds. This is long enough to read the text in any of the frames. Please make sure to keep a copy of the .psd file for the future to save time for any changes to come.
Before we get started on your animation, it would be wise to figure out what exactly you have in mind in creating an animation. One could think on his/her feet and build it, but it may take time to research your content, photos, colours, and so on. Once you have already figure out what you want, then start to work on creating the animation. By doing it this way, it will save a lot of time and frustration.
Timelines Panel
We need the Timelines Panel; therefore, Go to Window > Timelines > A dialogue box will open and Change the setting to Frames OR use the Motion Workspace.
- The first step in creating any animation in Photoshop is to build a file that is layered with all the elements you plan to animate. We will use folders for organization & turning these folders on and off for the animation.
- Create a New Document. File > New. Or Ctrl/Cmd N.
- Click on the folder in the layers panel three times to create three folders.
- Rename the folders from Group to Frame, therefore:
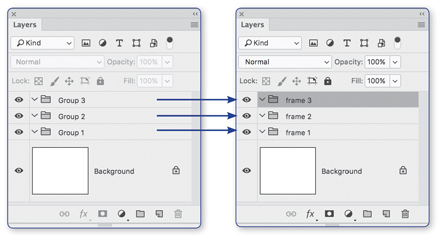
By doing this, it makes the names cleaner & consistent with the names in the Animation panel when it comes to the timeline.
Two different methods in creating an animation
Copy and Paste Method
Open some pictures.
- Select the whole image, select all or Ctrl/Cmd A
- Choose a portion of the image with the Marquee tool (a tool that has a dotted line that appears as a square or circle in the toolbox), and Once done
- Copy the image Edit > Copy or Ctrl/Cmd C
- Once you have copied your image, you can close that window.
- Paste into your Folder Layer file
Drag and Drop Method
Drag and Drop our Layers into our Folder Layer file.