Welcome back, if you read our previous post on Optimize Your Photos, great. We will continue with the exact steps to Optimize your Images with a PC without the use of Adobe Photoshop. The reason this post was created because once students finish the program at school, and they do NOT purchase Photoshop, there needs to be an alternative for them to resize images versus having extremely large pictures with WordPress.
Using Paint 3D
If you are on a PC, continue to read and watch. If you are on a Mac, please read this page for the Mac version!
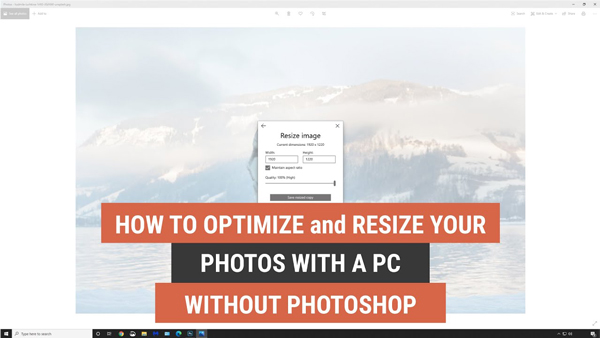
One could use the application called Paint 3D. We will open this in Paint 3D, and we can go to Image > Resize and enter the Actual Size here. If you noticed, you could see the dimensions in percentages and pixels here. I am going to change my size to be 1920 pixels wide. Click OK when ready. My file size of the file does go down to 2mb to 458kb! That’s a lot of space savings, but not only that, my image will upload and download quickly. But, maybe, I can squeeze a little more from it. And there is.
Tinypng.com or Tinyjpg.com
Would you imagine this image was further optimized by 50% and still retained its quality? How? It’s called tinypng.com or tinyjpg.com. Both websites are the same, and they take both file formats on each other’s websites. I have always used tinypng.com since the early days of 2012. Yep, you heard, right! That’s how long this site has been up! One could upload the images through the website, or you can purchase the plugin for Photoshop.
For this Tutorial
I will be using a free online tool. Not only that, but I also love seeing the difference in how much space I save when uploading my images online! Go to either tinypng.com or tinyjpg.com. I am using tinypng.com in my example. Depending on which website you may use, one website uses jpg and the other uses PNG. When an image is uploaded to the website, it is processed and analyzed through the site. It looks at the colours and selectively decreases the number of colours in the image and removes any unnecessary metadata in the picture, reducing the file size dramatically.
In my example, the husky image was saved down to 458kb using Paint 3D. You can either drag and drop the image inside where it says or click anywhere on the big button to browse and select your images. You will notice another 69% was reduced, and my final size is 132kb! If we look at this side by side, do you see any difference between the two? Having an image optimized for the web, but also, it will download quickly on a mobile device too!