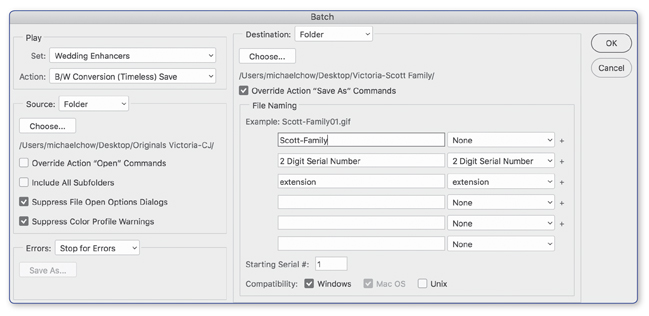
We can use the newly created Action as part of a batch for future use. I like to create a folder to save those images first before I start my Batch.
Note: You must have “Save As” step in the Action; the Batch command does not automatically save files.
File > Automate > Batch. A dialogue box will be open. Play, Source, Destination and Errors will be shown.
- In the Play section, pull-down “Action” and select the Action, if there is more than one set of actions.

- In the Source section, click the ‘Choose’ button and highlight the folder of files you want the Action used.
- Turn on Suppress File Open Options Dialogs and Suppress Color Profile Warnings. I turn these on so that the actions do not stop (it hides the warnings).
- In the Destination section, click the ‘Choose’ button and find a folder (the folder I just created) or create a new folder.
- Override Action “Save As” Commands. We will be saving into one big folder, so we don’t need to be asked where we want to save.
- In the Errors, you can either choose to Log the Errors (Save a text file on your computer) or Stop the Batch Process for Errors. Sample Error Message:
- Click, “OK.” And watch the Action in progress in the Action Panel and in the Layers Panel too.
Note: If, for whatever reason, the Batch didn’t go through, look at the Action, 95% of the time, it’s because of how the Action was set-up.

One thought on “Learn How to Create a Batch Process Activity”