Photoshop’s Save For the Web command is a dream come true for preparing images for the Internet, or even for saving images in a quick-loading format for Microsoft PowerPoint slide presentations, and you don’t have to leave Photoshop. Any images that are used for the web are typically saved at 72ppi. By using this feature in Photoshop, automatically saves it at that resolution. No guessing anymore. The Save For Web command lets you open any Photoshop document, and convert it into a web-friendly format using the GIF, JPEG, PNG, or WBMP formats (although, I have never ever used a Windows Bitmap before). You can even try different optimization settings or compare various optimizations using the 2-Up or 4-Up panes. Also, the dialogue area below each image provides optimization information on the size and download time of the file.
Check out the YouTube video, Saving for the Web
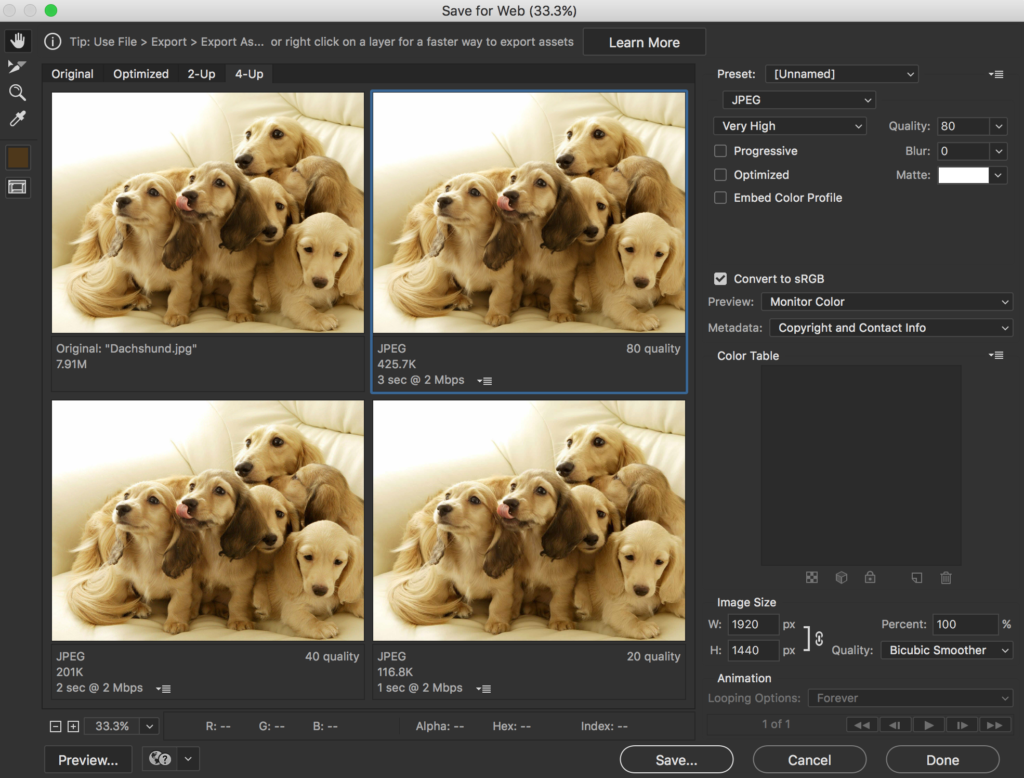
Let’s Get Started with an Image
- Open a document.
- For the PC: Click the File menu, and then click Save For Web & Devices
OR the Mac: File > Export > Save for the Web (Legacy) - Click the Original, Optimized, 2-Up, or 4-Up tabs to view the document using different layouts.
- Considering tools for the images
The six icons top left-hand corner are:
- Hand Tool. Drag the image to change the view of a document.
- Slice Selection Tool. Select a predefined image slice.
- Zoom Tool. Click on the image to expand the view size.
- Eyedropper Tool. Drag within the image to perform a live sampling of the colours.
- Eyedropper Color. Clicking on this icon opens the colour picker
- Toggle Slices Visibility. One can hide or show slice numbers and change the colour of slice lines.
*Note: If you place your mouse over the image, and right-click it, you can also change how the image can be viewed by percentage, actual size, fit in view and fit in the screen.
For trackpad users, use two fingers to see this option.
Size matters when dealing with images on the web! Options of compressing your images in one of four formats appropriate for use on the Web: GIF, JPEG, PNG, and WBMP.
*Note: I tend to use JPEG for photos and full coloured logos, GIF for simple logos, and if I have type in my images, PNG. Furthermore, if I genuinely need a transparency image, then I would use the format PNG.
Convert to sRGB?
For web-only, you should always save and publish them as sRGB. Why? Because most browsers will render images as sRGB regardless of what you save it as, causing Adobe RGB images to appear desaturated and washed out. If you want your pictures to look the same despite where it’s being viewed, you should always publish them as sRGB—WYSIWYG, what you see is what you get.
File Formats
GIF
Useful for clip art, text, or images that contain a large amount of solid colour. GIF uses lossless compression. The following options:
Colour Options
Reduction: Click to select a visual reduction method for the image’s colours (Selective is the default).
Colours: Either enter or select a value from 2 to 256 maximum colours.
Web Snap: Enter or select a value from 0% to 100% to instruct the GIF compression utility how many of the image colours should be web-safe.
Dither Options
Method of stimulating colours NOT available on your monitor
Method: Click the list arrow, and then select from the available dithering schemes (No Dither, Noise, Diffusion or Pattern). Dithering refers to how the GIF format mixes the available colours in the image.
Each Colour Reduction has a different algorithm and colour table:
Perceptual: Creates a custom colours table that the human eyes have higher sensitivity
Selective: Creates a colour table similar to the Perceptual colour table, but broader colours and preserves web colours (default setting)
Adaptive: Creates a custom colours table by sampling colours from the predominant spectrum in the image
Restrictive: Uses the standard 216-colour table common to the Windows and Mac OS 8‑bit (256-colour) palettes also known as the WEB palette
Diffusion: Applies a random pattern that is less noticeable
Pattern: Applies a halftone (variation in size of dots of ink in various colours or gray) square design to stimulate any colours in the colour table
Noise: Same as Diffusion but not diffusion on the adjacent pattern
Amount: Enter or select a value from 0% to 100% to instruct the GIF compression utility how many of the image’s colours should be dithered. *The Higher percentage will give you an appearance of more colours, more detail, and a bigger file.
Transparency Options
Transparency: Check to keep the transparent areas of a GIF image open and choose the type of transparency dither (None, Diffusion, Pattern, or Noise).
Matte: Click to fill the transparent areas of a GIF image.
Dither: Click to select a dithering scheme (None, Diffusion, Pattern, Noise) and enter an amount for the mixing of the matte colour.
Other Options
Interlaced: Check to have the GIF image load in three scans.
Lossy: Enter or select a value from 0 to 100 to instruct the GIF compression utility how much image loss is allowed
JPEG
Useful for images that contain a lot of continuous tones, like photographs. JPEG uses lossy compression. JPEG has the following options:
Compression Quality: Click the list arrow, and then select a preset JPEG quality from Low (poor condition) to Maximum (best quality).
Quality Amount: Enter a JPEG quality compression value (0 to 100). The lower the value, the more information (colour) is sacrificed for image size.
Blur: JPEG images compress better when the picture has soft edges. Apply the Blur option to increase the softness of the image (at a sacrifice of image quality).
Progressive: Select the checkbox to load a JPEG in three continuous scans. Some browsers do not support it.
Embed Color Profile: Select the checkbox to embed an ICC colour profile into the JPEG image. This increases the file size but helps maintain colour consistency between monitors and operating systems.
PNG-8
Functions like the GIF format. PNG uses lossless compression. PNG-8 has the following options:
Colour Options
Reduction: Click to select a visual reduction method for the colours in the image (Selective is the default).
Colours: Enter or select a value from 2 to 256 maximum colours.
Web Snap: Enter or select a value from 0% to 100% to instruct the PNG-8 compression utility how many of the image’s colours should be web-safe.
Dither Options
Method: Click the list arrow, and then select from the available dithering schemes (None, Diffusion, Pattern, or Noise). Dithering is how the PNG-8 format mixes the available image’s colours.
Amount: Enter or select a value from 0% to 100% to instruct the PNG-8 compression utility how many of the image’s colours should be dithered.
Transparency Options
Transparency: Check to keep the transparent areas of a PNG-8 image open.
Matte: Click to fill the transparent areas of a PNG-8 image.
Dither: Click to select a dithering scheme (None, Diffusion, Pattern, or Noise) and enter an amount for the mixing of the matte colour.
Other Options
Interlaced: Check to have the PNG image load in three scans.
PNG-24
Functions like the JPEG format. PNG-24 uses lossless compression. PNG-24 has the following options PNG-24 supports millions of colours. (16 millions of colours compared to PNG-8, supports 256 colours)
Transparency Options
Transparency: Check to keep the transparent areas of a PNG-24 image open.
Matte: Click to fill the transparent areas of a PNG-24 image.
Other Options
Interlaced: Check to have the PNG-24 image load in three scans.