A selection will show as a marquee of “marching ants.”

Note: For a smoother edge on an elliptical selection, check Anti-alias on the Options bar (Keep the Feather Value at 0px.). Anti-alias is the process of a digital graphic image or type so that it has a smooth edge rather than a jagged edge.
Things to remember:
To Deselect:
- Ctrl/Cmd-D or
- Menu Bar > Select > Deselect or
- Alt-click to minus from selection or
- Click outside of the marquee selection
- If the toolbox shows a black triangle, click on the tool and hold a few seconds for the other tools to pop open (fly-out), and then select your weapon of choice
- To choose other tools, within the same fly-out, use the keyboard shortcut, (M or Shift-M) to scroll through.
- Different letters on the keyboard denote a tool. For example, P is for Pen Tool, V is for Move Tool.
- Add to a selection, hold the Shift key, and minus from a selection, hold down Option/Alt key.
Open an Image
- Open an image and click on a layer or background.
- Select either the rectangle or elliptical marquee tools.
- Drag diagonally or Shift-drag to create a perfect square or circle.
- A marquee of “marching ants” will appear on your screen.
- In the Options bar, of the Control Panel above, you can choose a Fixed Ratio or Fixed Size. Enter the Width & Height values of the selection.
Lasso Tool
The Lasso Tool creates freehand selection; this tool can be used to clean up selections in conjunction with the other means, such as the Magic Wand or Quick Selection tool.
- Choose the lasso tool. Try and draw around the shape. Drag around an area on the layer.
- This initial selection doesn’t have to be precise. When you decide to release the mouse, the open ends of the selection will automatically be joined.
- To add to the selection, hold the Shift key and drag around the area to be added.
- To subtract from the selection, hold the Alt/Option key and drag around the area to be removed.
Polygonal Lasso Tool
The Polygonal Lasso Tool creates straight-edge polygonal selections.
- Choose the polygonal lasso tool. Draw a straight line, position the pointer where you want the first straight point to end, and click; Continue to click to set endpoints for subsequent segments.
- To draw a straight line at an angle of 45°, hold down Shift as you move to click the next segment.
- To draw a freehand segment (i.e. Lasso tool on the fly), hold Alt (PC)/Option (Mac), and drag
- To close the selection:
- Position the polygonal lasso tool over the starting point (a closed circle appears next to the tip), and click to close.
- Double-click the Polygonal Lasso tool pointer.
- Ctrl-click (PC) or Command-click (Mac).
Magnetic Lasso Tool
The Magnetic Lasso Tool creates an edge selection tool that detects an image’s edges and automatically selects the pixels around them (border snaps to the edges of defined areas in the picture.) Selections are freehand, but with assistance from Photoshop.
- Choose the Magnetic lasso tool. The magnetic tool will automatically add points along the edges of your picture or where you place the mouse to be. Position the first point where you want to start and click; then continue clicking along the edge to set endpoints for subsequent segments.
- Set any of these options:
Width:
To specify a detection width, enter a pixel value for width. The Magnetic Lasso tool detects edges only within the specified distance from the pointer. To change the lasso pointer so that it indicates the lasso width, press the Caps Lock key. You can change the pointer while the tool is selected but not in use. Press the right bracket (]) to increase the Magnetic Lasso edge width by 1 pixel; press the left bracket ([) to decrease the width by 1 pixel.
Contrast:
Enter a value between 1% and 100% to specify the lasso’s sensitivity to edges in the image. A higher value detects only edges that contrast sharply with their surroundings; a lower value detects lower-contrast edges.
Frequency:
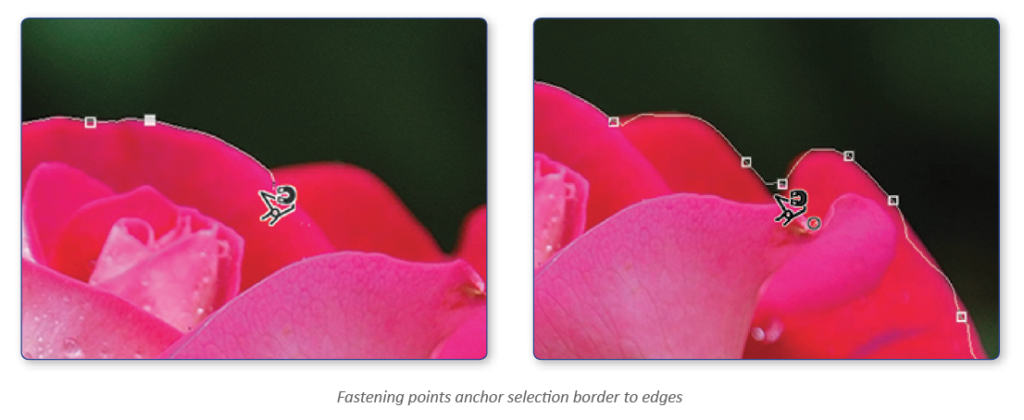
To specify the rate at which the lasso sets fastening points, enter a value between 0 and 100 for Frequency. A higher value anchors the selection border in place more quickly. On an image with well-defined edges, try a higher width and higher edge contrast, and trace the border roughly. On an image with softer edges, work a lower width and lower edge contrast, and trace the border more precisely.
- The most recent segment of the selection border remains active. As you move the pointer, the active segment snaps to the strongest edge in the image, based on the detection width set in the options bar. Periodically, the Magnetic Lasso tool adds fastening points to the selection border to anchor previous segments.
- If the border doesn’t snap to the desired edge, click once to add a fastening point manually. Continue to trace the edge and add fastening points as needed.

- To switch temporarily to the other lasso tools, do one of the following:
- Use the lasso tool on the fly, hold Alt (PC)/Option (Mac), and drag while pressing the mouse button
- Or use the polygon lasso tool on the fly, hold Alt (PC)/Option (Mac) and click.
- To close the selection:
- Position the magnetic lasso tool over the starting point (a closed circle appears next to the tip), and click to close.
- Double-click the magnetic lasso tool pointer
- Press Enter or Return
- Ctrl-click (PC) or Command-click (Mac).