In our last post, we explored the Generative Turntable feature. We’re diving into its partner tool: As of May 22, 2026, Adobe has changed the name again, it’s now called Concept to Vector formerly known as Sketch to Vector and Generative Trace (available now in Illustrator Beta). I’ve had the privilege of testing this feature early on with the Adobe’s Illustrator Beta development team and helping shape how it functions, so I’m thrilled to finally show you what it can do.
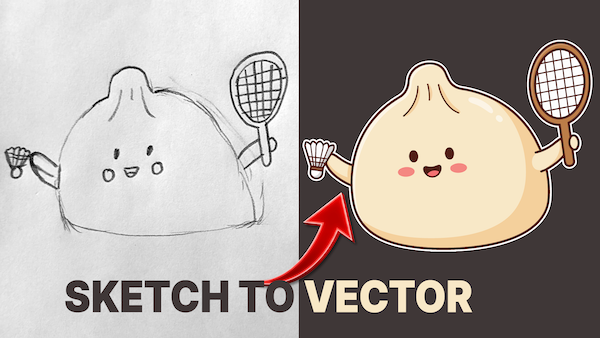
It is incredibly fast at turning rough sketches or existing artwork into clean, scalable vectors. To put it to the test, I have a very personal “rescue mission” today.
The Backstory: Why I told my kid to make her own stickers!
I recently started a project to see if I could recreate high-end boutique stickers using the latest Adobe Illustrator Beta features. I noticed my youngest buying expensive $5-$10 stickers from craft shows and consignment stores, which got me wondering: can we use the new Sketch to Vector (now called Convert to Vector) tool to create professional-grade designs even better than the ones in-store?
For years, the standard way to convert a hand-drawn sketch to a logo or digital file was to manually trace with the Pen tool or settle for the often used Auto Trace settings. The new Sketch to Vector (aka Convert to Vector) tool in the Illustrator Beta is a total game-changer. Instead of a basic scan, it uses AI to turn paper drawings into clean, scalable vector paths instantly.
If you are looking for high-detail sketch accuracy, the GPT models within the app are incredibly precise. For those working with complex colors and fine details, tools like Nano Banana and Nano Banana Pro offer a level of control that traditional tracing tools just can’t match. It’s the fastest way I’ve found to move from a physical sketchbook to a finished digital design.
Today, I’m putting Illustrator’s Sketch to Vector (aka Convert to Vector) to the ultimate test. I wanted to see if I could take a raw hand-drawn sketch and turn it into a crisp, professional-grade sticker design that looks even better than the ones in the boutique shops.
How to Access the Beta
Currently, Sketch to Vector is available in the Adobe Illustrator Beta. To try it yourself:
Open your Creative Cloud Desktop App.
Select the Apps tab on the left.
Click the Beta tab at the top.
Find Illustrator (Beta) and click Install.
Why it Beats the Old “Image Trace”
You might be wondering: “Isn’t this just Image Trace?” Not exactly.
While traditional Image Trace converts pixels into paths by analyzing existing colors and contrast, Sketch to Vector (aka Convert to Vector) uses a generative AI engine. It doesn’t just look at the pixels; it understands the intent behind the lines. It produces cleaner geometry and offers significantly more stylistic control. Once you see the precision here, the old school method might become a thing of the past.
Step-by-Step: Putting the Models to the Test
To get started, place your artwork on your Illustrator artboard. It handles almost any format—JPG, PNG, PSD, or even a HEIC file from your phone.
Select your artwork. If you don’t see your tools, go to Window > Contextual Task Bar.
Choose “Convert to Vector” from the task bar.
Enter a prompt. I’ll keep it simple: “Convert to vectors.”
Adobe offers three “partner models” to choose from. One of the most powerful aspects of this beta is the ability to choose between different underlying models. We’re going to cycle through three “partner models” to compare the results: GPT Image, Nano Banana 2, and Nano Banana Pro. We tested all three to see the difference.
*NOTE: Using Sketch to Vector (aka Convert to Vector) consumes generative credits. I recommend watching the video comparison so you can decide which model is worth your credits before you hit “Generate.”
GPT Image: The result was doable, but it felt a bit “interpreted.” It wasn’t a perfect replica of the 15-year-old design, and in some tests, it actually stripped the color entirely, leaving me with just the outlines.
Nano Banana 2: This produced a completely different feel. It’s a good alternative depending on the “vibe” you’re going for, but still wasn’t quite there for my rescue mission.
Nano Banana Pro: This was the clear winner. It provided the closest match to the original shirt design, capturing the soul of the 15-year-old artwork perfectly.
Real-World Scenarios: Low-Res and Hand-Drawn
I also tested how the tool handles a common designer headache: The Low-Res File. Normally, scaling up a small web image results in a pixelated and blurry mess. However, Convert to Vector (aka Sketch to Vector) reimagines the details. While the base models stripped some color, Nano Banana Pro model stood out, accurately restoring the logo’s integrity while the other models struggled with color retention. Yep, Nano Banana Pro again stayed true to the original logo design.
Final Thoughts
It’s incredibly encouraging to see Adobe offering multiple AI paths within a single tool. For those of us dealing with low-res client files or trying to preserve sentimental designs, this is a massive time-saver.
Whether you need a quick turnaround or a high-fidelity restoration, you now have a creative accelerator that turns a “sketch” into a brand-new masterpiece. While I’ve found my favourite model, the beauty of this tool is that you can choose the path that fits your specific creative needs. Give it a shot in the Beta and let me know which model fits your style best.
Thanks for reading, and I’ll see you in the next one!